Estock - All You Need To Know About The Bot


eStock is a bot that is currently taking the world by storm. It has multiple options and features that will be discussed later on in this article. The simple reason why it is so popular as of now is due to the fact that it works; the success rate of the bot is hard to compare with and thus, we are seeing a surge in the popularity of this bot. eStock is considered as an AIO by the botting community because of the fact that it supports a host of websites including Best Buy, Walmart, Amazon, Target, UNIQLO, The Home Depot, Pokemon Centre, New-egg and a few more too. One thing that you may notice is that it doesn’t support a website that primarily sells sneakers like many other bots nowadays do. The reason why many bots support sneaker websites is that the sneaker market is growing exponentially, and it shows no signs of stopping anytime soon. However, this has a downside too – the mere fact that the sneaker market is booming as it is means that many bot developers are putting all their time into developing sneaker bots. This has opened a space in the market for bots that go past the traditional sneaker websites and help buyers purchase from other websites; eStock is one such bot that exploits this market and this can be a factor as to why this bot is so popular.
Overview
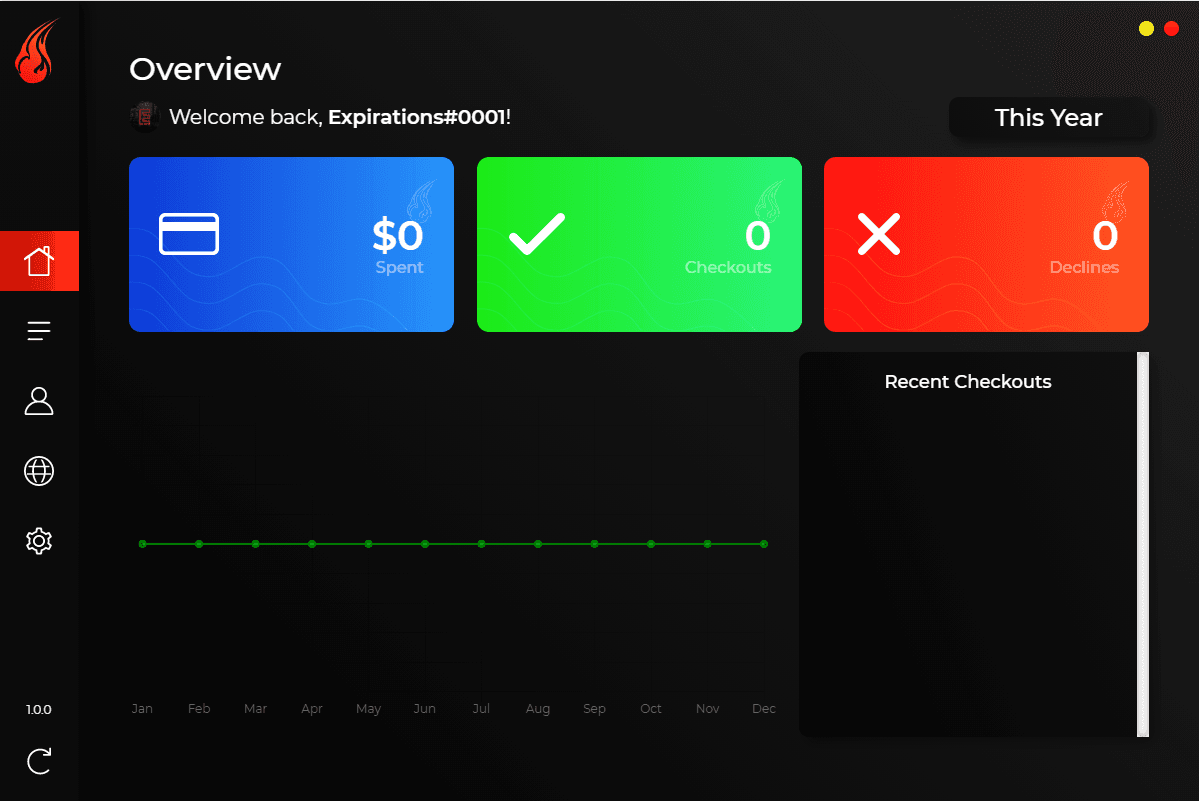
Another reason why the bot is so popular is that it pairs a host of websites that aren’t usually supported by AIO bots with a clean, simple User Interface (UI). The UI is simple to navigate and isn’t too complicated and this is why it is described as a good bot for beginners too. The main page of the bot is known as the ‘Overview’ page; from this page, you can access all the other areas of the bot. The main purpose of the Overview Page is to house statistics about checkouts. What you will notice is that the Overview page features 3 cards – one of a blue color, one of a yellow color and one of a red color. The blue card, which is on the left of the Overview page, shows how much money (in US Dollars) has been spent through the bot. The green card, which is in the center of the screen when you open the overview page, highlights the number of successful checkouts that have been carried out using eStock. As you can probably work out, the red card (which is located on the right of the screen), highlight the number of failed checkouts. When using the bot, you can almost be sure that the number on the green card will outweigh the number on the red cardboard the success rate is pretty good. Most bots don’t outline how many failed checkouts that have taken place and thus, it is good to see that the bot is being transparent with their statistics. The lower half of the ‘Overview’ page features a graph of recent checkouts; the graph will outline the same statistics as the green and red cards on the same page but will do this visually.
The Overview Page also features a sidebar on the left-hand side which features links to the tasks, profiles, proxies and settings tabs. The page also features a few technical details like the version number of eStock and the account number of the Discord that the license key of the bot is connected to.
Tasks
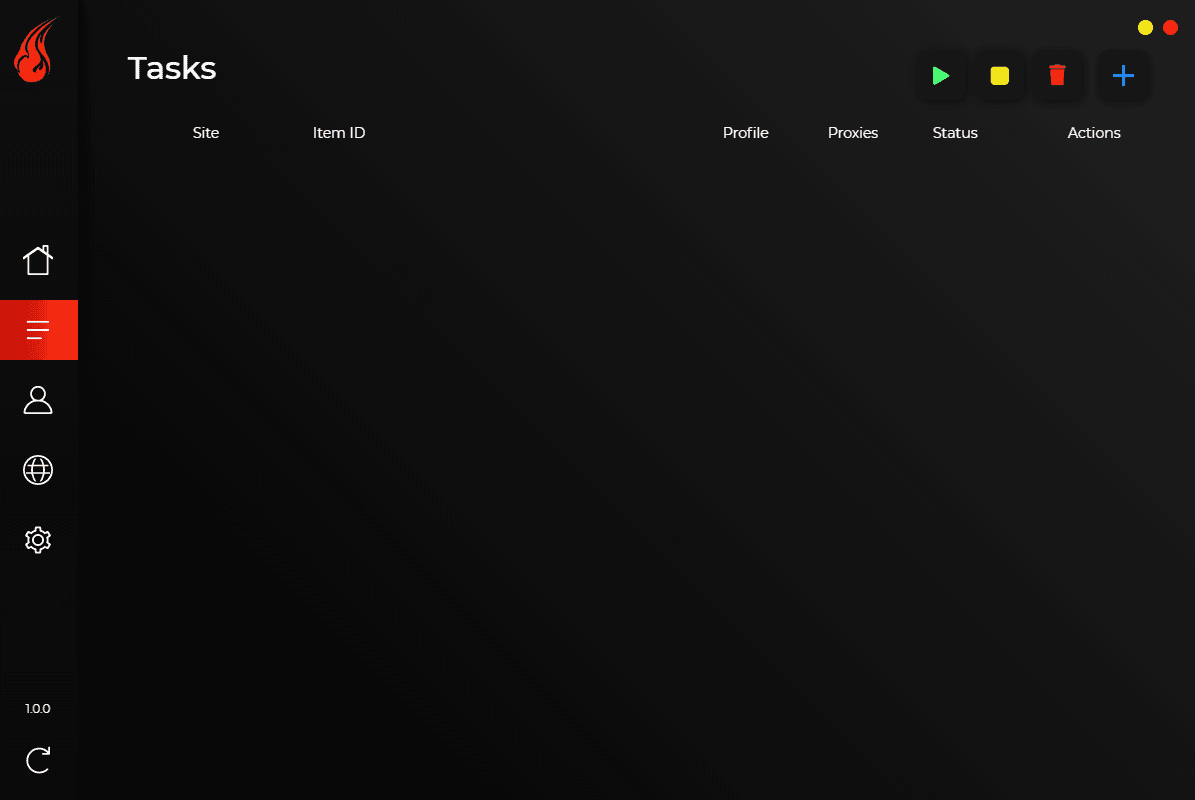
The bot also features a page that is dedicated to the smooth creation and functioning of Tasks. When opening the tasks page, which is outlined by 3 horizontal lines on the sidebar, you’ll see a blank page (this depends on the number of tasks you have created, and it will be blank on the assumption that you have not created any tasks on eStock as of yet) which features 6 columns. The columns are named site, item ID, profile, proxies, status, and actions. As you add tasks, you’ll slowly see this page filling up with the relevant details in columns. At the top right-hand side of the Tasks page, you can find 4 buttons which are necessary for the controls and creation of Tasks. The green triangle (which looks like a play/pause button) is used to start all the tasks which have been created. The yellow square is used to stop all tasks that are running at the time. The blue Plus button (+), which is located on the furthest to the right, opens another tab which can be used to create various tasks. The red trash button is used to delete all tasks. While clicking these buttons, you delete, stop, or start all the tasks at one go. However, if you individually click a task and then press the corresponding button, you can start, stop, and delete individual tasks too. When creating a button using the blue plus button, pop up will show up to make it easy and simple to create a task. Simply fill out the site of the task, the link of the product that you are trying to purchase and a few other details like profiles, proxies, the quantity of the time and task count. While the above guide should be sufficient, more details or instructions can be found on the company website.
Profiles
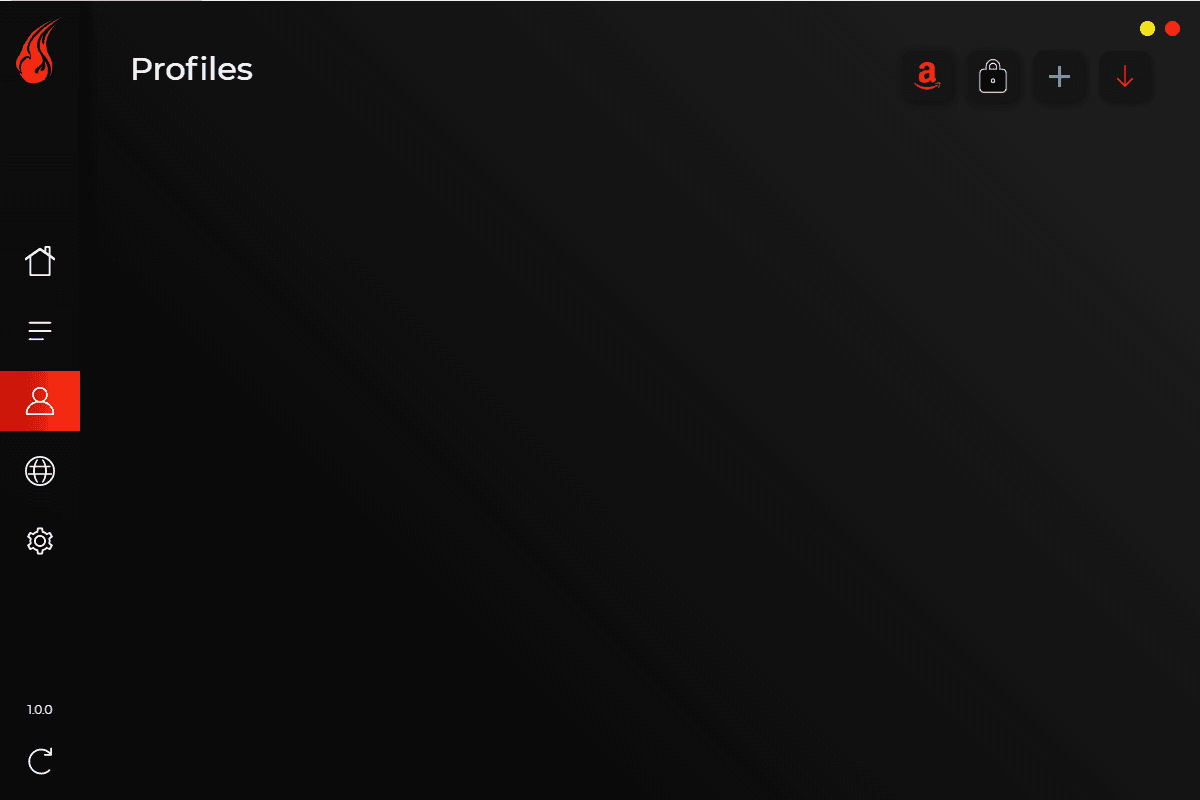
The bot also features a page that is dedicated to the management of profiles. In a similar way to the Tasks Page, the Profile page features 4 buttons that are located on the upper right of the page that can be used to control and create Profiles. The red button, which features the Amazon logo, can be used to redirect you to your Amazon sessions. The second button from the left, which is a lock, is used to redirect the user to their accounts. The blue plus button can be used to create Profiles (more on this later); the red button, which is located the furthest to the right, is used to import profiles. Profiles can be imported from AYCD or Kylin One Click. As of now, the bot only supports profiles that are located in the United States, Canada or the United Kingdom; this is one disadvantage of the bot. The developers behind the company have suggested that they will be expanding the countries where profiles are supported in the near future, and this will be a good step to expand the operations of the bot further.
After clicking the blue button to start the process of creating a profile, you will be prompted to add in a first and last name, an address, an email address, and a phone number. Once this is done, the bot will direct you to a page that is titled ‘Payment Information’ where you will be prompted to add your card details.
After clicking the lock button, you can add accounts for Walmart, Target, Best Buy US, and Pokémon Centre; this can be done by clicking the blue plus button (after you have clicked on the lock button) and then simply entering your email address and password as well as choosing the site that you want the account for. eStock will handle the rest and create the accounts – these accounts can then be used when creating tasks.
Proxies
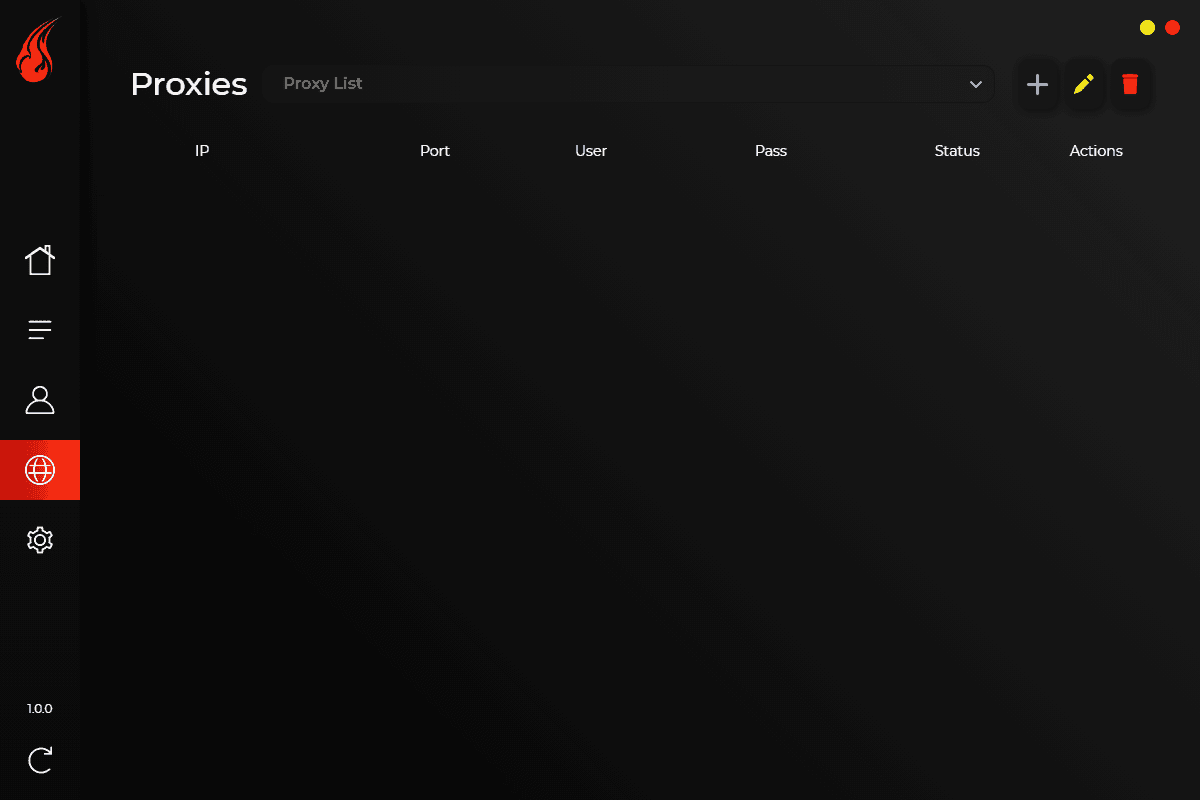
The next page is dedicated to the management of Proxies too. As you can see, the developers have clearly set out pages (that can be easily accessed through the sidebar on the left-hand side), which makes it a breeze to use this bot, even if you are a beginner. While we are on this topic, it must be said that the documentation provided is certainly not the best I’ve seen however, the bot is still extremely to use, and you really can’t go wrong. Furthermore, if you are in dire need of help, there is always YouTube to help. Back to the Proxies tab – like the other tabs, the developers have put the main creation and controlling functions at the top right of the Proxies tab.
Another similarity to other pages is that there are 4 buttons that can be clicked – the first button (from the left) is a downward arrow which acts as a dropdown menu. From the dropdown menu, you can access existing proxy lists. The blue plus (+) button can be used to create a proxy list, the yellow pencil button can be used to edit a proxy list and the red trash button can be used to delete a proxy list. You can choose to edit or delete one or several proxy lists at one time when you wish to do so. When creating a proxy list, using the blue plus button, you will be prompted to add a name for the proxy list – it makes sense to choose a name that makes the proxy list easy to recognise as you may have several at one time – and you will have to paste the list of your proxies too. Now, the developers have made it so that only a certain format of proxies will be accepted. Follow this format to make sure that your proxies will work after you paste them in – ‘ip:port:user:password & ip:port’. Beware that any other format of proxies will not work so make sure to keep this in mind. Once you have created a proxy, it will appear on the screen with its properties being listed in a table. The columns of the table are IP, Port, User, Pass, Status and Actions. One column that will come in use quite often is the ‘Actions’ column that is located furthest to the right; this column features a green triangle that can be used to run and test your proxies. There are two results that you may get after pressing the green triangle button – the first is that the proxy works, which is shown by a green status, and the other is an error message.
Settings
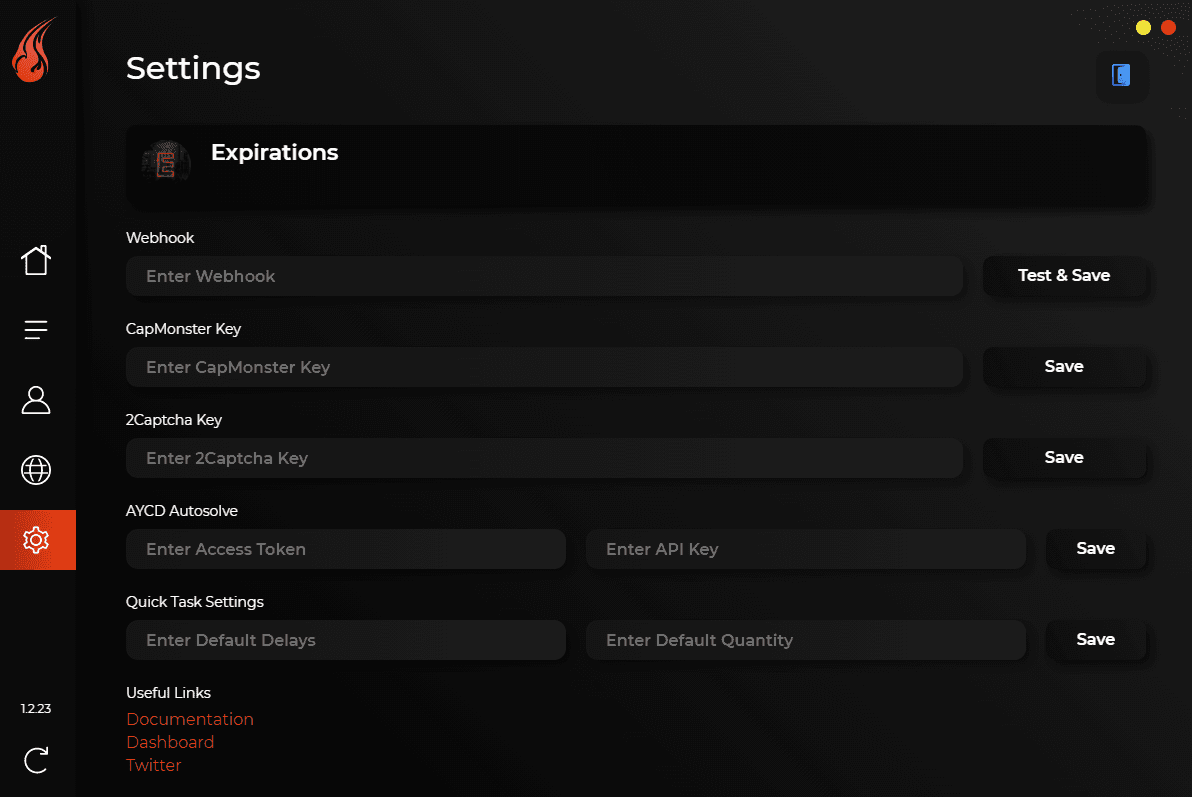
The final page that can be accessed through the sidebar is the Settings page. Through the settings page of eStock, you can input your web hook, 2 Captcha Key, AYCD Auto solve tokens and input quick task settings too. You can also deactivate your key from the settings page too; simply hop over to the #commands channel and type the command ‘-reset’ in. This will allow you to successfully deactivate your key and the benefit of this is that you can now use the same key to access eStock from a different machine.
eStock’s settings page has a section that is dedicated to Captcha’s. Nowadays, it is common to see companies introducing human verification to be ‘secure’. However, there are ways around this and eStock allows you to exploit these methods. 2Captcha and CapMonster are 2 ways around Captcha verification. While these must be purchased separately through their respective websites, you can enter the key that you will get after purchasing either bot into eStock and this will allow you to integrate a ‘captcha-solver’ directly into your bot. One company that uses captchas is Walmart (which eStock supports). Walmart uses a captcha from PerimeterX to deter most bots but if you are using either CapMonster or 2Captcha, PerimeterX won’t be able to stop you from successfully botting.
You can also edit ‘Quick Task’ settings from the Settings Page of eStock. Details such as default delays and default quantities can be edited through this field. The settings page can also be used to access eStock’s documentation, eStock’s dashboard (where you can change your subscription details) and eStock’s twitter page.
Setup

If you believe that you want to make the leap to buy eStock, I advise reading this section to make sure that the bot will be compatible for your setup. The official download page for eStock can be found in the #download channel of the eStock server. Of course, what you are paying for is access to the server rather than just a bot in this case. Once you are in the server, simply click the link for the download and the subsequent pop ups and you should be good to go. One thing to note is that if you are a windows user, you will also have to download the .bat file that can be found in the same channel of the server.
Once eStock has finished installing, you’ll see that the download manager for eStock will close automatically. The developers behind eStock recommend that any firewalls are disabled or eStock is made an exception. The developers have assured us that no harm will come upon your device and that the disabling of the firewall is just to ensure that eStock is able to run undeterred. If you are having difficulties with the installation of eStock, please access the eStock website at docs.estockfotware.com to find more support.
When eStock is first opened, you will be prompted to enter in a license key and click the login button. If you are successful with logging in, you will be transported to the overview page of eStock and you are ready to go.
Final Words
Overall, The bot chooses to distinguish itself from the herd of bots that are being released every year. The websites that it supports, and its success rate are some of the reasons as to why eStock is a good bot. The simple UI and easy-to-navigate instructions mean that it is perfect as a bot for beginners too. There is no real downside to the bot except the fact that it would be nice if it supported a few sneaker websites too.